With each new update, Stardew Valley keeps adding tons of fresh content. Right now, the game can be split into two main phases: Before Ginger Island and After Ginger Island (Stay tuned for the next chapter!).
Stardew Valley Walkthrough Before Ginger Island
Your main goal in the early game is very clear: prepare to unlock Ginger Island and complete Grandpa’s Evaluation to get the Statue of Perfection before he comes back in Year 3.
Luck Impacts Your Success in Stardew Valley
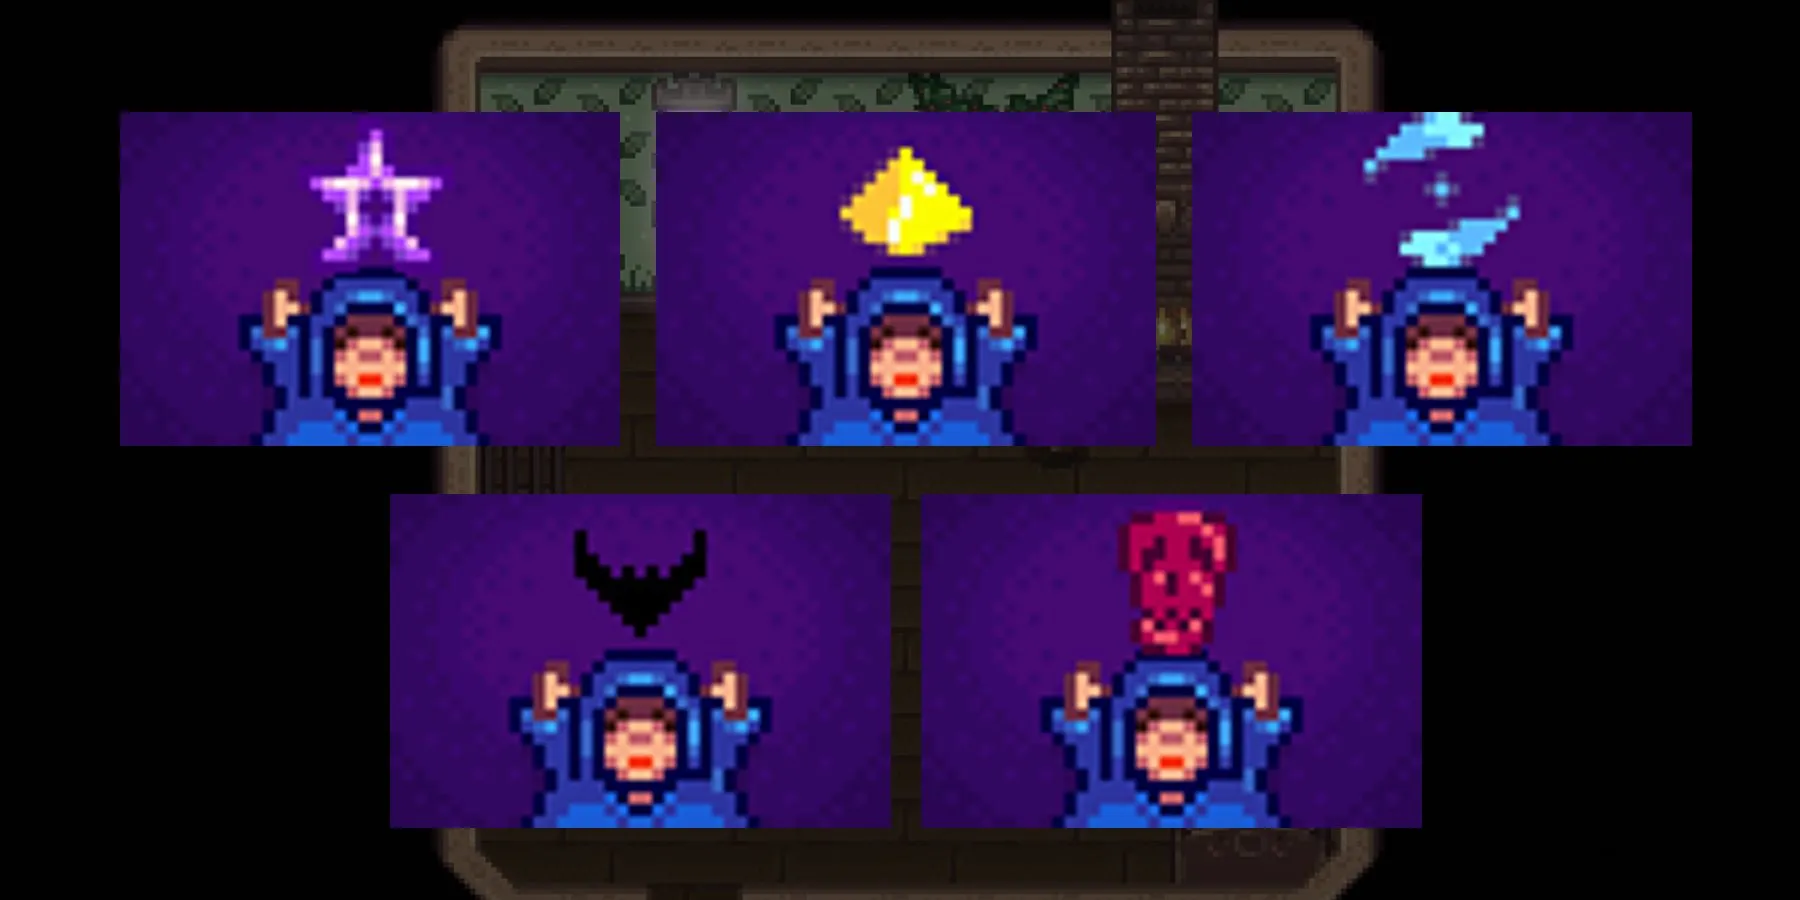
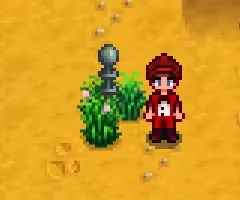
Before diving into everything else, one important tip: Luck plays a huge role in this game! Make sure the first thing you do every morning is check the TV for the Fortune Teller. If your luck is good, hit up the mines for some serious resource gathering or head out fishing. But if your luck's bad, like shown in the icon below, focus on other tasks like chopping trees or chatting with NPCs and handing out gifts. Luck affects everything – on bad luck days, you’ll likely end up fishing junk or hitting rocks with no ores in the mines.
Tips for Energy in Stardew Valley
The green bar in the lower right corner is the Energy. Here's what you need to know:
Energy Tips in Stardew Valley
The green bar in the lower right corner represents your Energy. If it drops to 0, you’ll suffer a penalty, halving your Energy bar for the next day. To avoid this, make sure not to deplete your Energy completely.
Health
The red bar next to the Energy bar represents your health. This bar won’t appear until you unlock combat or get attacked by monsters.
If your health bar is depleted, you won’t die, but you’ll wake up in the hospital and randomly lose some items, which can be costly.
Always carry food to replenish your health and Energy, especially when entering combat areas like the mines.
Sleeping
Only sleeping in your hut will save your progress.
Sleeping will fast-forward time to 6:00 AM the next day.
The latest you can go to bed is 2:00 AM. If you don’t sleep by then, you’ll pass out, and though you won’t lose items, some of your money will be deducted.
Fainting
If you faint after 2:00 AM, you’ll be forced to sleep. But if you have no funds and are far from home, continue working on tasks until you faint rather than rushing back.
Farm Basics, Tips and Tricks
Here’s a look at the farm map. After getting your 15 starter parsnip seeds, hoe up some soil, plant them, and water them with the water you get from the nearby pond (you can see it to the lower right on the map). After you’re done planting, if you’ve got Energy left, go ahead and chop some trees or clear rocks. Also, don’t forget to craft a chest to store all your items.
You’ll notice some scattered green tufts (fiber plants) blocking your way – cutting them down with the Scythe (no energy use!) will give you fibers and seeds, which will come in handy later. Don't chop grass just yet! It turns into hay for your animals, so wait until you’ve got a Silo built. If you chop it too early, it won’t drop anything. So, as for your first building, it’s a good idea to start with a Silo, then think about adding a chicken coop or barn afterward. (Building a silo requires 100 gold coins, 100 stones, 10 clay and 5 copper bars, buying it from Robin at the carpenter's shop)
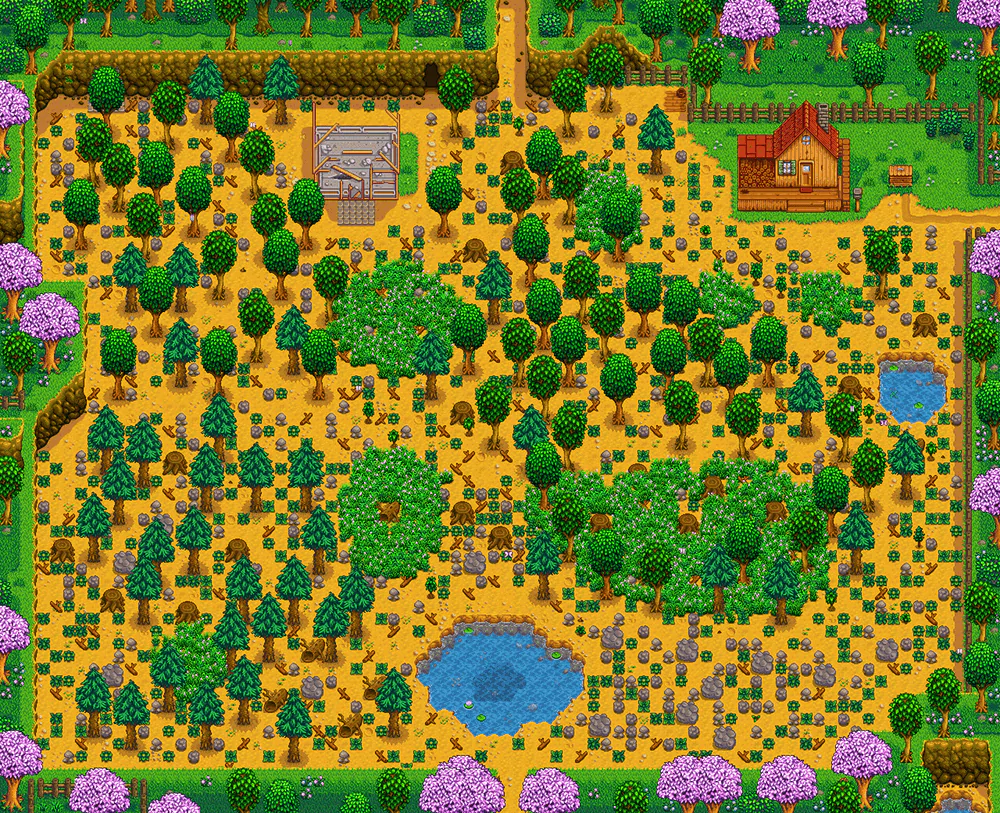
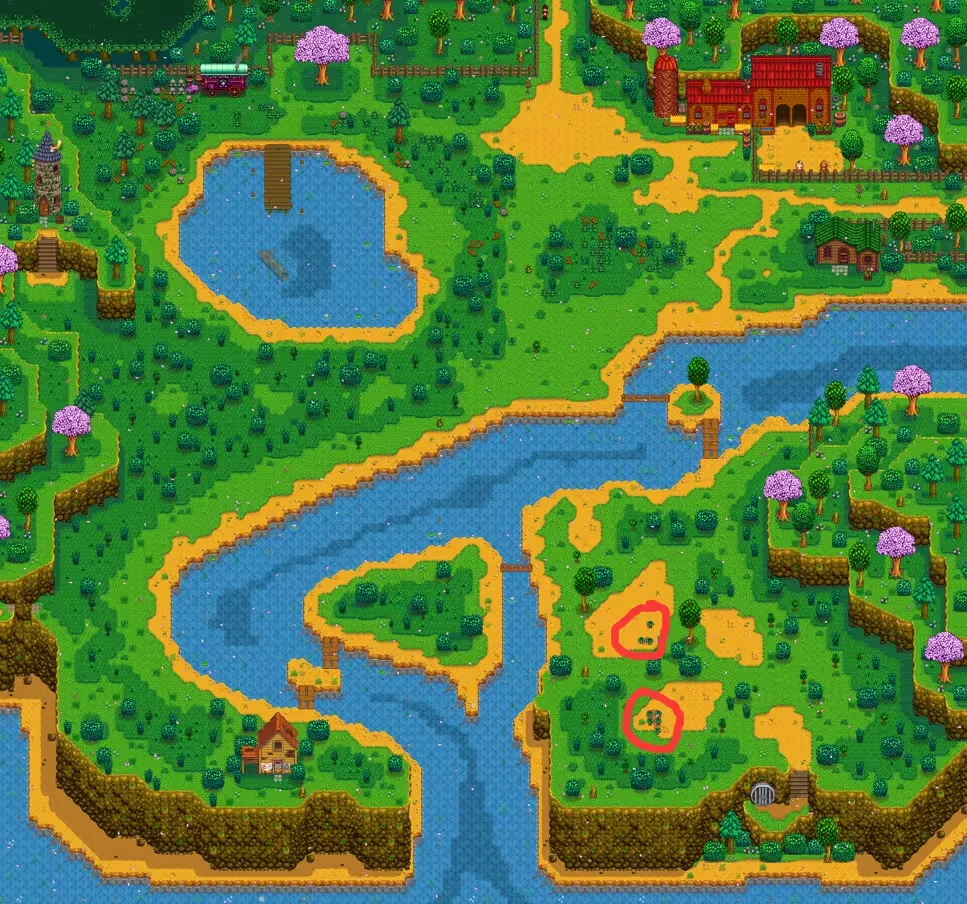
Below the farm, you’ll find the Cindersap Forest, and every spring, you can find loads of spring onions in the lower-right corner of the forest – these are perfect early-game energy boosters. Don’t save them; just eat them on the spot! On the map’s upper left, you’ll also find the Traveling Cart, which sells rare goods.
Berry Collection
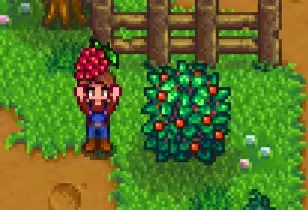
When foraging, remember that during Spring (Days 15-18) and Fall (Days 8-11), you can gather American raspberries and blackberries from most bushes. Make sure to spend these days running around the map collecting them. These will come in handy for restoring health and energy while mining.
Best Profession to Choose
There are five main skills in the game, and at Levels 5 and 10 of each, you’ll have to choose a profession. The Profession can be changed later (find the Statue of Uncertainty
in the Sewers of Pelican Town), but it will cost a lot of money. Here's my recommendation for each skill:
- Farming: Tiller & Artisan - You’ll be brewing and processing goods for major profits later.
- Mining: Miner & Prospector - Ores are always in short supply, no matter what stage you’re at.)
- Foraging: Forester & Lumberjack - You'll need a lot of wood for various builds, like kegs and houses.
- Fishing: Fisher & Angler—Fishing is your early-game money-maker; later, you can switch to Crab Pots.
- Combat: Scout & Desperado - After the Ginger Island update, weapon enchantments are super effective with critical hits.
There are some controversies surrounding the best combat skills to choose. Some people prefer Fighter & Brute early on, but later switch to Scout & Desperado to maximize critical hit potential. I prefer stacking critical hit skills directly, but the difference between these choices is minor. So choose whichever suits you best, it depends on your playstyle.
fd
vf
Special Events - Bat Cave or Mushroom Cave
After earning 25,000 gold, Demetrius (Robin’s husband) will show up to ask if you want to convert the cave on your farm.
- Bat Cave: Recommended for early game, as it generates various fruits (including tree fruits like apples and peaches), which helps with completing the Community Center bundles.
- Mushroom Cave: Produces all sorts of mushrooms, which are great for making life-saving potions. However, it’s not as profitable as the Bat Cave. May consider selling the mushrooms instead and using the profit to buy food for health recovery, as this can be a more efficient approach.
Personally, I went with the Mushroom Cave because I prefer having potions for safety during mining trips. Plus, the Mushroom Cave is easier to decorate than the Bat Cave.

Core Gameplay - Making Money through Farming
When you start the game, you’ll be on your farm. The map below shows the layout. The game starts on the first day of Spring, and each season only lasts 28 days. Keep in mind that crops don’t survive past the season they’re planted in, so always double-check how many days are left in the season before buying seeds.
Here’s a list of the most profitable crops in different seasons, ranked by their average daily income. The number of days in parentheses indicates how long it takes to harvest the crop, and "XX/day" shows the average daily income. Crops labeled as "continuity" can keep growing until they die when the seasons change.
Early Stage Tip for Crops
Once you reach farming level 1, unlock the scarecrow and place it near your crops to prevent crows from stealing them. Also, some crops are required for the community center bundles, and I’ve compiled a list of those crops for submission.
Crops Required for Community Center Bundles
Ordinary crops:
Parsnips, green beans, cauliflower, potatoes, poppies, sunflowers, red cabbage, wheat x10, tomatoes, peppers, blueberries, melons, corn, eggplants, pumpkins, yams
Gold quality crops:
Parsnips x5, melons x5, pumpkins x5, corn x5
Recommended Crops in Spring
In the first year, cauliflower and potatoes are the main crops to plant. Potatoes have a larger yield, though their output can be random. I recommend planting potatoes in batches so they mature by Day 12. Sell them all and use the money to buy strawberry seeds at the festival on Day 13, which is very profitable even if you only have 15 days left.
Coffee Beans (10 days, continuity, 25.56/day) – Only sold in the Traveling Cart
Strawberries (8 days, continuity, 20.83/day) – Sold at the Spring Festival on Day 13
Rhubarb (12 days)
Cauliflower (13 days)
Green Beans (10 days, continuity)
Potatoes (6 days)
Recommended Crops in Summer
In the first year, it’s hard to unlock the Desert Oasis, so you won’t be able to plant Starfruit right away. Focus on hops and blueberries in batches. Blueberries can be sold directly for profit, while hops can be saved for brewing light beer when you unlock kegs.
Starfruit (13 days, 26.92/day)
Hops (11 days, continuity)
Blueberries (13 days, continuity)
Sunflowers (8 days)
Melons (12 days)
Recommended Crops in Autumn
In the first year, don’t overfocus on autumn planting. Grow just what you need for the community center bundle, and then plant a small amount of cranberries. These can be useful as food for mining or health recovery during winter.
Cranberries (8 days, continuity, 18.89/day)
Ordinary crops cannot be grown outdoors during the winter season.
Special Crops
Rare Seeds (80.3/day) – Take 24 days to mature after planting in autumn. Buy seeds from the Traveling Cart
Ancient Fruit (57.14/day) – Can be planted in spring, summer, or autumn and grows continuously throughout the season
If you’re feeling ambitious and manage to save up to 42,500 gold by the end of Spring, consider unlocking the Vault in the Community Center to get access to the bus, which leads to the desert. There, you can buy Starfruit seeds from Sandy for big profits. However, this strategy leaves fewer resources for brewing in the Fall (then you may need to plant some extra pumpkins in the fall), so it’s not beginner-friendly. No rush! Stardew Valley doesn’t have many hard deadlines aside from Grandpa’s return in Year 3, and even if you don’t meet his standards, you can always ask for a re-evaluation later on by placing a diamond on his shrine.
In other words, this guide is aimed at achieving Grandpa’s perfect score by the start of Year 3 without rushing through the game. There are tons of ways to play Stardew Valley, so feel free to tweak the strategy to your liking!
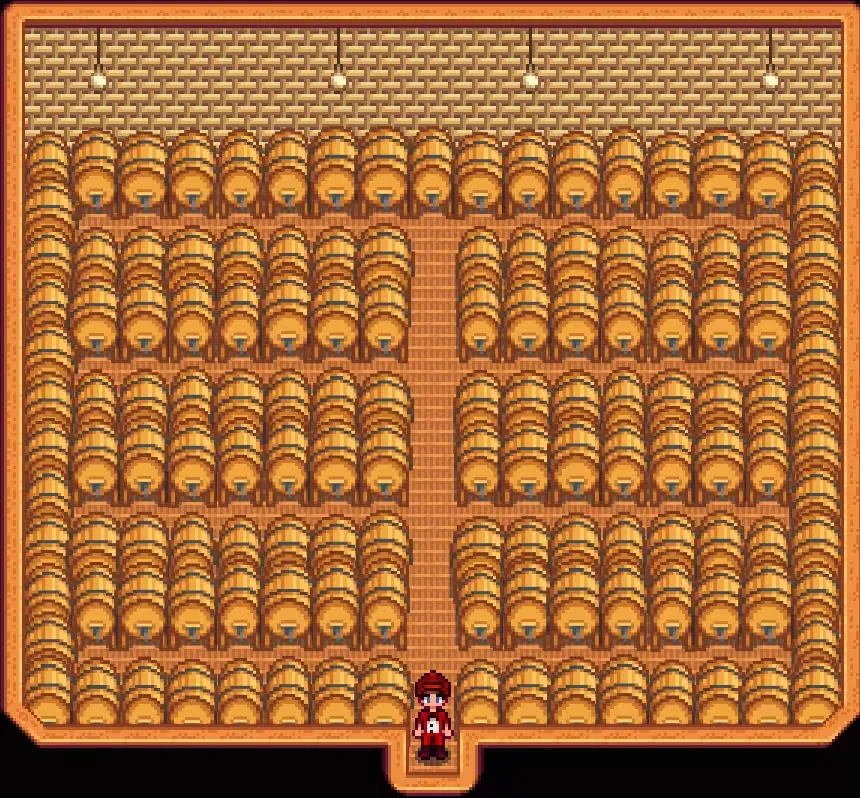
Winemaking
Winemaking is the most profitable activity in Stardew Valley, serving as a core way to generate income. Without it, the experience feels incomplete! Here are the best crops for winemaking:
Starfruit Wine:
Profit: 321.43/day
Brewing time: 7 days
Strongly recommended to age this in the wine cellar for maximum profit!
Ancient Fruit Wine:
Profit: 235.71/day
Brewing time: 7 days
Hops Beer:
Profit: 200/day
Brewing time: 1.5 days
It’s not recommended to brew wine from other fruits unless there’s no other option or keg space. Additionally, it’s best not to make juice from vegetables, except for high-priced ones like pumpkins in autumn.
If you're focusing on vegetables, the most economical way to profit is by preserving them in pickles.
Beehives
Beehives provide a side income throughout spring, summer, and autumn. Placing a flower next to your beehives will help produce flavored honey every 4 days from multiple beehives. Here’s a list of flowers and their profitability by season:
Spring: Blue Jazz-35.71/day
Summer: Poppy-67.85/day, Sunflower-55.71/day
Autumn: Fairy Rose-97.14/day
In winter, bees won’t come out to produce honey, so there’s no income from beehives during that season.
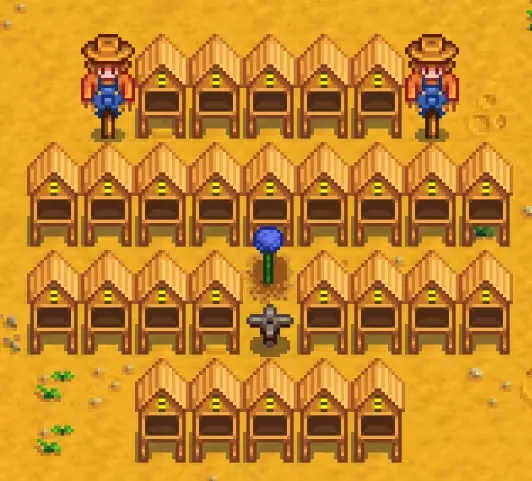
Beehive Layout
For maximum convenience and efficiency, like the one below, one flower can support up to 27 beehives. You can place more, but it becomes less convenient to collect the honey, which can be time-consuming. The flower in the middle doesn’t need to be picked throughout the season. In the next season, you can replant different flowers in the same position.
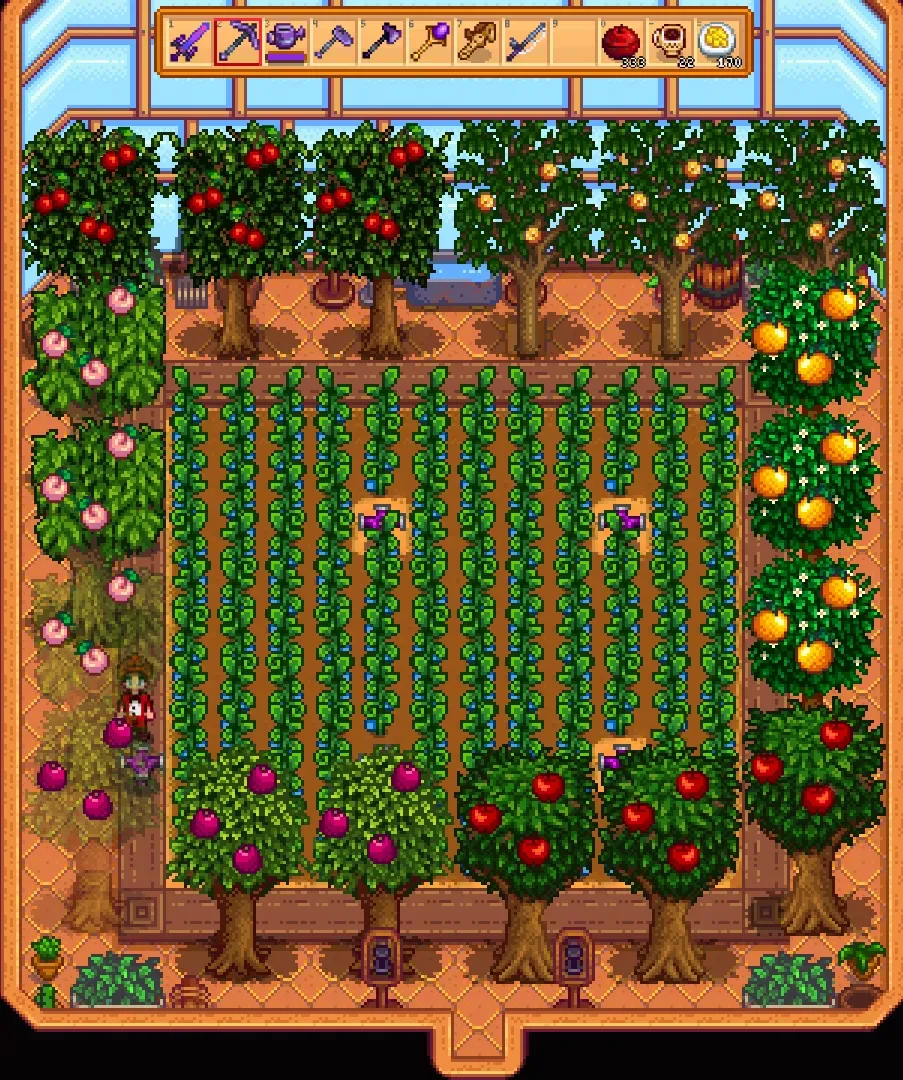
Fruit Trees
All fruit trees take 28 days to grow and require a 3x3 plot with no obstacles or other trees around them, or they won't grow. Once matured, they produce one fruit per day, and each tree can hold up to three fruits before needing to be harvested (every three days). Recommended trees:
Peaches: 140 gold per fruit, matures in summer.
Oranges: 100 gold per fruit, also matures in summer.
It’s advisable to plant these trees at the beginning of year two for the best results. Be sure to place lightning rods to protect your trees from storms.
Bundles
Bundles are part of the prerequisites for unlocking the Community Center, and completing them unlocks essential features like the greenhouse and bus. Additionally, completing bundles affects the Grandpa's Evaluation. Here's a quick summary of what you'll need to gather:
Common crops: Parsnips, green beans, cauliflower, potatoes, poppies, sunflowers, red cabbage, wheat (x10), tomatoes, peppers, blueberries, melons, corn, eggplants, pumpkins, yams.
Gold quality crops: Parsnips (x5), melons (x5), pumpkins (x5), corn (x5).
Fish:
Spring River: Sunfish, silver carp, catfish, herring, bream (at night).
Autumn River: Tiger trout, walleye (on rainy days).
Summer Lake: Largemouth bass, carp, bullhead, sturgeon.
Spring Sea: Sardines, eels (on rainy days).
Summer Sea: Tuna, red snapper, tilapia, pufferfish.
Mine: Ghostfish.
Desert Pond: Sandfish.
Secret Forest: Woodskip.
To avoid accidentally selling essential items, store them in a separate box as soon as you acquire them, or submit them directly to the community center.
NPC Favorite Gifts
NPC favorability is an important mechanic in Stardew Valley. Here are some key points to remember:
- The maximum favorability for most NPCs is 10 hearts, except for marriage candidates.
- For marriage candidates, the limit is 8 hearts, unlocking 10 hearts by giving them flowers, and eventually 14 hearts by gifting the mermaid pendant (for marriage).
- Favorability decreases if you don’t interact (chat) with NPCs daily before reaching the heart limit.
- It’s advisable to start increasing everyone’s favorability in the second year. During the first year, it’s okay not to stress about it.
- You can give each NPC two gifts per week, and the higher the quality (iridium > gold > silver > ordinary), the more favorability points you'll earn.
- After reaching the heart limit, NPCs' favorability will no longer decrease due to a lack of conversation.
- Birthday gifts are highly recommended, as they provide an extra favorability bonus.
Pro Tip: Carry a Rabbit's Foot!
If you plan on increasing favorability for all NPCs, it’s a good idea to carry a rabbit's foot at all times. This will protect you from triggering an event where single NPCs might reduce their favorability with you due to a conflict. Although the plot event cannot be avoided, carrying a rabbit's foot will prevent the loss of favorability from all NPCs.
Bachelors
Alex: Perfect breakfast, salmon dinner, daffodils, eggs
Elliott: duck feathers, all fruits except giant raspberries, all gems except quartz
Harvey: coffee, pickles, all gathering plants, all fruits except giant raspberries/scented berries, all gem minerals
Sam: cactus fruit, maple syrup stick, pizza, tiger eye stone, eggs, cola
Sebastian: tear crystal, sashimi, all gems, quartz
Shane: beer, chili, pizza, eggs
Bachelorettes
Abigail: amethyst, pufferfish, pumpkin, quartz
Emily: purple/citrine, red/emerald, daffodil quartz
Haley: coconut, pink cake, sunflower, daffodil
Leah: goat cheese salad, truffles, fruit wine, all gathering plants, driftwood
Maru: batteries, cauliflower, gold ingots, strawberries Spring Gathering
Penny: Emerald, Tuber Platter, Poppy, Melon, Dandelion, Chive
Non-Marriage Candidates
Caroline: Summer Sequins, Daffodils, Gemstones and Minerals except Quartz
Clint: Green and Red Aquamarine, Amethyst, Emerald, Gold Ingot
Demetrius: Ice Cream, Strawberry, Egg, Spring Gathering
Dwarf: Various Crystal Gems
Evelyn: Rose Fairy, Tulip, Beets, Tulip, Daffodil
George: Chive, Daffodil
Gus: Diamond, Orange, Daffodil, All Gems except Quartz
Jas: Rose Fairy, All Gems except Quartz, Daffodil
Jodi: Chocolate Cake, Pancakes, Eggs, Milk, Fruit
Kent: Roasted Hazelnuts, Daffodil, Egg
Krobus: Wild Horseradish, Pumpkin, Diamond, Quartz
Leo: duck feather, mango, ostrich egg, parrot egg, poi
Lewis: Hot pepper, blueberry, coconut cactus, daffodil, mayonnaise, cheese
Linus: cactus, coconut, spring collection, green onion
Marnie: diamond, pink cake, egg, milk
Pam: beer, parsnip, all fruit except cactus
Pierre: daffodil, dandelion, egg, milk, cheese
Robin: goat cheese, all fruit, all gemstones
Sandy: daffodil, quartz, goat milk, all fruit
Vincent: grapes, daffodil, coconut
Willy: catfish, sea cucumber, pumpkin, quartz
Mizard: Purple mushrooms, sunlight/void essence
Stardew Valley Tips and Tricks for Buildings and Animals
Best Way to Use Your Farmhouse
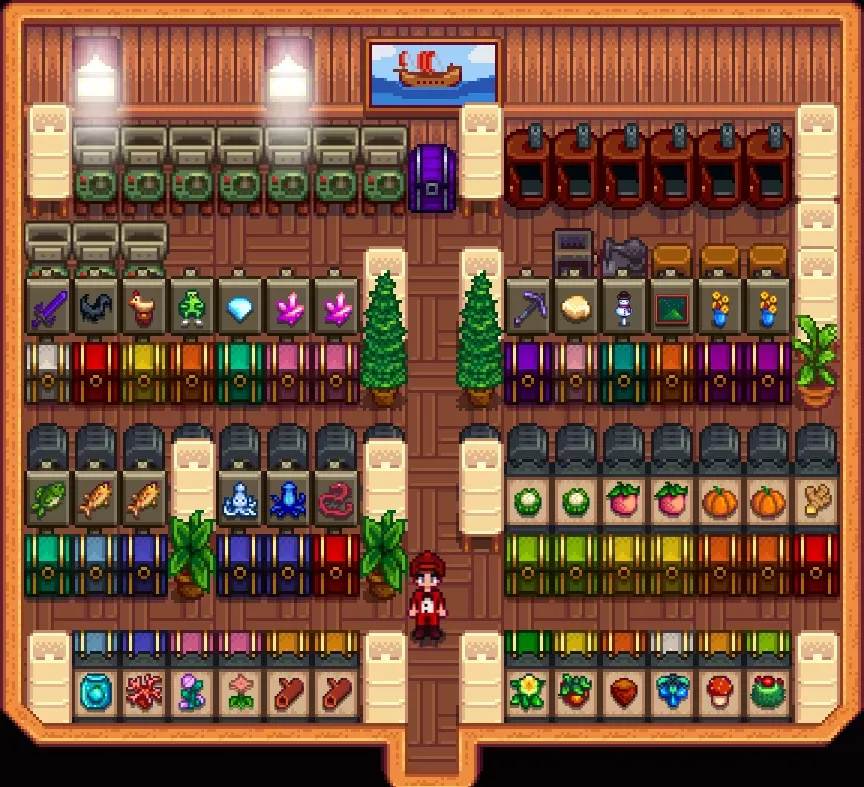
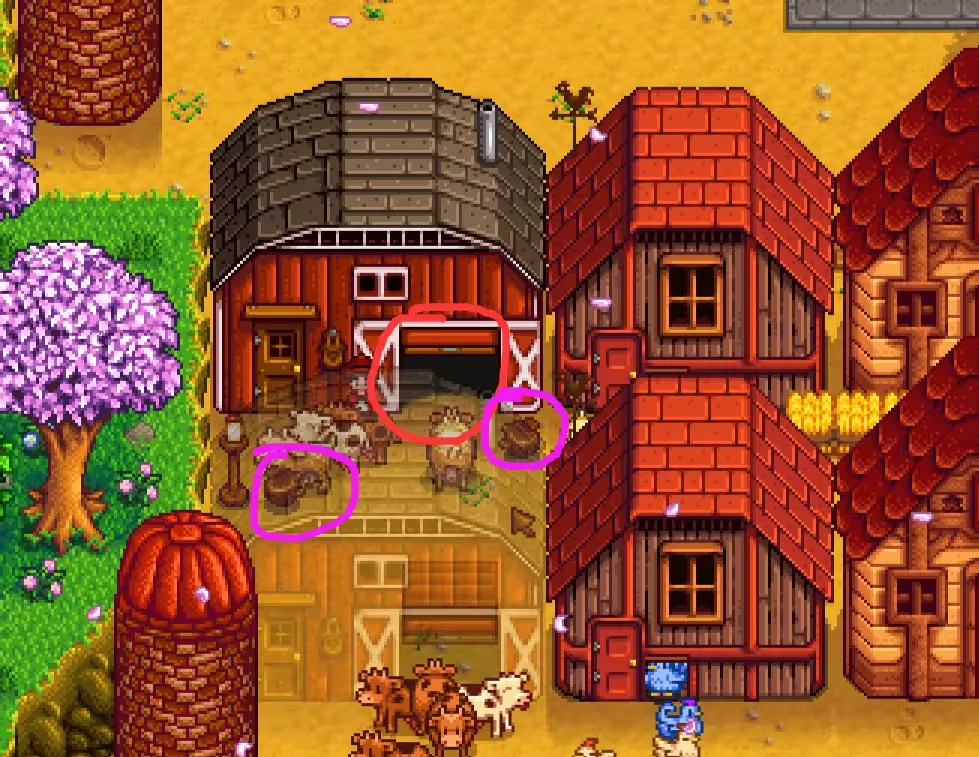
Once you upgrade your hut to a large house, it becomes useful for storing many items. I recommend creating a separate storage hut specifically for organizing boxes. This makes it simple to categorize items and prevents clutter. Below is a screenshot of my warehouse design, which I find both functional and aesthetically pleasing. Although it's still under renovation, you can see the layout, and it's a good reference for your design.
Recommended Buildings
- Silo: This should be the first building you construct to store hay.
- Chicken Coop and Barn: Next, consider building these to raise chickens, cows, and pigs.
Other animals like sheep, goats, ducks, void chickens, dinosaurs, and ostriches (found on Ginger Island) only need one each. You can raise more rabbits for rabbit’s feet, though it's not necessary to raise them in large batches since their income isn’t significant unless you're focusing on favorability bonuses.
Raising Pigs
Pigs are the most profitable livestock, and it’s easy to raise them. During spring, summer, and autumn, open the barn door to let them roam and forage for truffles, which you can collect and press into truffle oil for sale. Pigs are expensive, so start with cows in the early game and make sure to milk them daily.
How to Increase Animal Friendship Rating
There are three ways to increase your animals' favorability:
- Touch them daily (a heart will appear when you successfully interact with them). Do this in the morning since they cannot be touched while sleeping.
- Ensure they have food. If your gate opens, animals graze on grass instead of consuming hay. In winter, they stay inside, so they buy heaters from Marnie's store to keep them comfortable.
- Close the gate in winter to keep animals safe and warm.
Additional Tips
Placing streetlights and lightning rods around the lawn can help protect it from being eaten by animals. The grass grows naturally, so let it expand near the barn and coop for a steady food supply.
Stardew Valley Tips and Tricks for Mine
The mine is located in the top right corner of the map and opens on the fifth day. When you enter for the first time, you’ll receive a sword. The right-click function allows you to block all attacks, and the weapon has no durability, so use it freely. Every five floors, the elevator unlocks, allowing you to travel between floors quickly.

Mineral Collection:
Minerals are essential at all stages of the game:
- Copper ore: Floors 30-40
- Iron ore and coal: Floors 40-50
- Gold ore: Floors 80+
In the early stages, manually dig for ores. In the mid-to-late game, buy super bombs from the dwarf store (1,000 gold each) to quickly clear large areas of ore. It’s far more efficient than buying stones from Robin’s store.
Other mines like the Skull Cavern, Volcano, and Mr. Qi’s Challenge mine are much more difficult. Be well-prepared with food and bombs before venturing into them, and save them for the later stages.
Stardew Valley Tips and Tricks for Fishing
Fishing in Stardew Valley varies by season, time of day, and weather conditions. While challenging in the beginning, it becomes easier over time and serves as a great source of early-game income. Since this section has a lot of content, stay tuned the another guide to fishing!
Grandpa's Evaluation
By the third year, you can easily meet the requirements for Grandpa's evaluation, with a total of 21 points available. When you reach 12+ points, Grandpa’s ghost will reward you with the Statue of Perfection, which produces iridium ore every day! Here's a breakdown of the points system:
- Earnings: 1 point each for earning 50,000, 100,000, 200,000, 300,000, and 500,000 gold, and 2 points for earning 1 million (7 points total).
- Skill levels: 1 point for reaching skill level 30 and 1 point for reaching skill level 50 (maxing out all five skills), for a total of 2 points.
- Keys: 1 point each for obtaining the Skull Key and the Rusty Key (2 points total).
- Community Center completion: 3 points for finishing all bundles.
- Pet relationship: 1 point for having a pet with more than 4 hearts (make sure to pet your cat/dog every day).
- Villager relationships: 1 point for having 5 villagers at 8 hearts, and another point for having 10 villagers at 8 hearts.
- House and marriage: 1 point for upgrading your farmhouse to the final stage and getting married.
- Selling all goods: 1 point for selling at least one of each type of item (check your collections tab for progress).
- Fish: 1 point for catching all fish types.
- Museum collection: 1 point for completing the museum collection.
While this guide is a great starting point, Stardew Valley has much more to explore, and some events and surprises are better discovered on your own. I won’t spoil any more, but I encourage you to enjoy your adventure at your own pace! Play Stardew Valley free online with Funpass now! With the Funpass cloud storage function, you never lose track of where you are.
A guide for Ginger Island will be coming soon. Until then, happy farming!